Getting Started with Vue
Snowpack is a great fit for Vue projects of any size. It’s easy to get started and can scale to projects containing thousands of components and pages without any impact on development speed. Unlike traditional Vue application tooling, Snowpack saves you from getting bogged down with complex bundler setups and configuration files.
This guide is a step by step from an empty directory to a fully configured Snowpack project, in the process teaching:
- How to set up your Snowpack development environment
- Adding your first Vue component
- Importing images and other web assets
- Enabling Hot Module Replacement (HMR)
- Connecting your favorite tools
Prerequisites: Snowpack is a command-line tool installed from npm. This guide assumes a basic understanding of Node.js, npm, and how to run commands in the terminal. Knowledge of Vue is not required; Snowpack is an excellent way to learn Vue!
💡 Tip: a Vue/Snowpack working example is available in our Create Snowpack App templates.
Getting started
The easiest way to start a new Snowpack project is with Create Snowpack App, a tool for creating a new project based on our example templates. @snowpack/app-template-minimal is a Create Snowpack App template for a simple, bare-bones Snowpack project setup that the rest of this guide builds on.
Run the following command in your terminal to create a new directory called vue-snowpack with the minimal template installed:
npx create-snowpack-app vue-snowpack --template @snowpack/app-template-minimal
Head to the new vue-snowpack directory and start Snowpack with the following two commands:
cd vue-snowpack
npm run start
You should see your new website up and running!
Now that you have a basic project up and running, the next step is to install Vue. Run the following command in your project directory:
npm install vue@3.0.11 --save
💡 Tip: add the
--use-yarnor--use-pnpmflag to use something other than npm
npm install @snowpack/plugin-vue --save-dev
Snowpack plugins are a way to extend Snowpack’s capabilities without having to do custom configuration yourself. Install the @snowpack/plugin-vue plugin so that Snowpack knows how built .vue files into JavaScript and CSS files that run in the browser:
Once installed, you’ll need to add the plugin to your Snowpack configuration file (snowpack.config.mjs) so that Snowpack knows to use it:
  // snowpack.config.mjs
  export default {
    mount: {
      /* ... */
    },
    plugins: [
+    '@snowpack/plugin-vue',
    ],
  };
Restart your Snowpack dev server to run it with the new configuration. Exit the process (ctrl + c in most Windows/Linux/macOS) and start it again with npm run start.
💡 Tip: Restart the Snowpack development server when you make configuration changes (changes to the
snowpack.config.mjs).
Snowpack will recognize the new dependency (Vue, or “vue/internal”) and print the following output as installs your dependencies for the frontend:
[snowpack] installing dependencies...
[snowpack] ✔ install complete! [0.45s]
[snowpack]
  + vue@3.0.11
  └── @vue/runtime-dom@3.0.11
    └── @vue/runtime-core@3.0.11
      └── @vue/reactivity@3.0.11
        └── @vue/shared@3.0.11
Create your first Vue component
You now have your Snowpack environment set up to build .vue files for the browser. Now it’s time to create your first Vue component file!
Create a file named App.vue in your project directory with the following code:
<script>
  export default {
    setup() {
      return {};
    },
  };
</script>
<template>
  <div>Welcome to my Vue app!</div>
</template>
Add an ID of #root to the body tag in your index.html
// index.html
- <body>
+ <body id="root">
    <h1>Welcome to Snowpack!</h1>
    <script type="module" src="/index.js"></script>
  </body>
Now you can use the new App.vue file in your index.js:
// index.js
- console.log('Hello World! You did it! Welcome to Snowpack :D');
+ import { createApp } from 'vue';
+ import App from './App.vue';
+ createApp(App).mount('#root');
The page should now say “Welcome to my Vue app!“. Congratulations! You now have your first Vue component!
Customize your project layout
Snowpack is flexible enough to support whatever project layout that you prefer. In this guide, you’ll learn how to use a popular project pattern from the Vue community.
├── src/        <- your Vue components and their assets (CSS, images)
│   ├── index.js
│   └── App.vue
└── public/     <- global assets like images, fonts, icons, and global CSS
    ├── index.css
    └── index.html
Use your favorite visual editor to rearrange and rename, or run these commands in the terminal:
mkdir src
mkdir public
mv index.js src/index.js
mv App.vue src/App.vue
mv index.html public/index.html
mv index.css public/index.css
This means if you are running Snowpack right now, the site is now broken as the files are all in different places. Lets add a “mount” configuration to update your site to your new project layout.
The mount configuration changes where Snowpack scan for and builds files. Head back to the snowpack.config.mjs file you edited when you added @snowpack/plugin-vue. Add this to the empty mount object:
  // snowpack.config.mjs
  export default {
    mount: {
-     /* ... */
+     public: '/',
+     src: '/dist',
    },
  };
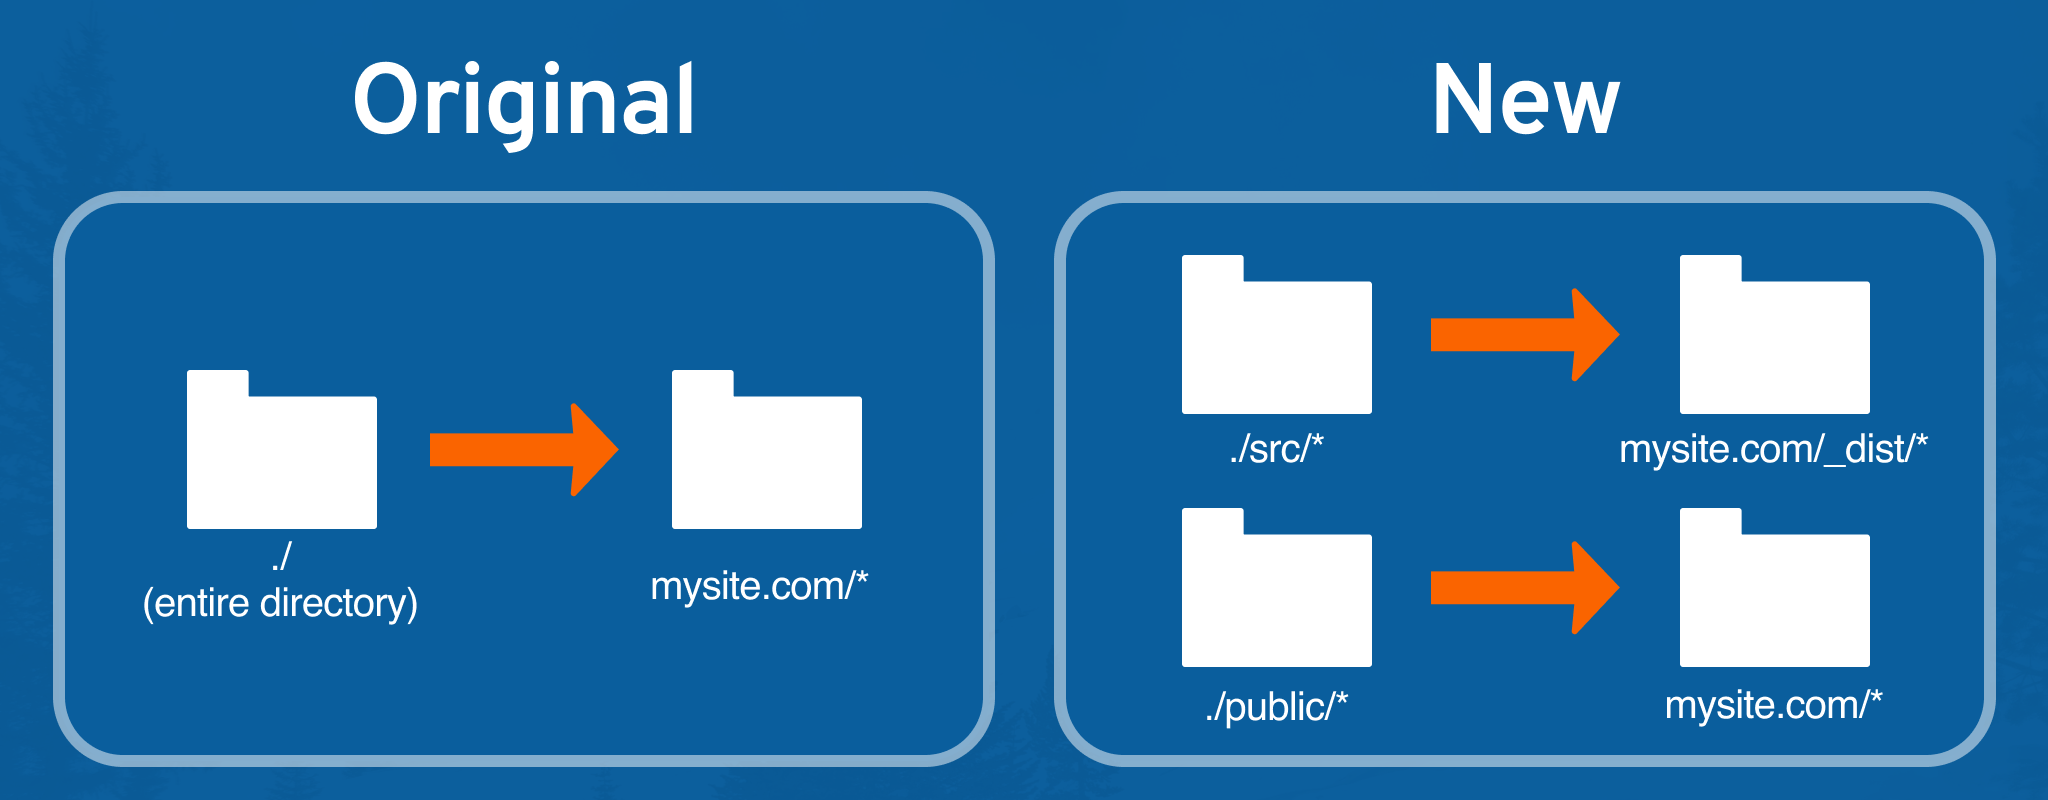
mount is part of the Snowpack Configuration API. It allows you to customize the file structure of your project. The key is the name of the directory and the value is where you’d like them in the final build. With this new configuration, Snowpack builds files in the public directory (e.g. public/index.css -> [build]/index.css). Likewise, it builds files in src (e.g. src/index.js -> [build]/dist/index.js, so change that path in your index.html:
<!-- public/index.html -->

  <body>
    <h1>Welcome to Snowpack!</h1>
-   <script type="module" src="/index.js"></script>
+   <script type="module" src="/dist/index.js"></script>
  </body>
You’ll need to restart Snowpack (stop the process in terminal and then run npm start again) for configuration file changes. It should look exactly as it did before, but now using your brand new project folder layout
Adding an animated Vue Logo
In Vue you can add CSS directly to your component. This step demonstrates this capability by adding an animated logo.
Download logo.svg to your public directory. Now you can add it to your App.vue
<!-- src/App.vue -->

  <header class="App-header">
+   <img src="/logo.svg" class="App-logo" alt="logo" />
    <a
      class="App-link"
      href="https://vuejs.org"
      target="_blank"
      rel="noopener noreferrer">
      Learn Vue
    </a>
With Vue, CSS can go directly in your .vue component. Add this code to the top of App.vue between the <style> tags:
<!-- src/App.vue -->

<style>
  .App-header {
    background-color: #f9f6f6;
    color: #333;
    min-height: 100vh;
    display: flex;
    flex-direction: column;
    align-items: center;
    justify-content: center;
    font-size: calc(10px + 2vmin);
  }
  .App-logo {
    height: 36vmin;
    pointer-events: none;
    margin-bottom: 3rem;
    animation: App-logo-pulse infinite 1.6s ease-in-out alternate;
  }
  @keyframes App-logo-pulse {
    from {
      transform: scale(1);
    }
    to {
      transform: scale(1.06);
    }
  }
</style>
Adding a counter to your Vue component
Snowpack is one of the only Vue dev environments to support Fast Refresh by default. With Fast Refresh, as you make changes to .vue files, Snowpack pushes live updates to the browser without losing your place or resetting component state. To see this for yourself, go ahead and add a simple timer to your App.vue component.
Vue components include component specific scripts in a <script> tag. Add the counter here in App.vue between the <script> tags:
<!-- src/App.vue -->

<script>
  import {onMount} from 'vue';
  let count = 0;
  onMount(() => {
    const interval = setInterval(() => count++, 1000);
    return () => {
      clearInterval(interval);
    };
  });
</script>
Then lower down in your component’s body, add this code that displays the results of the timer.
  <!-- src/App.vue -->

  <div class="App">
    <header class="App-header">
      <img src="/logo.svg" class="App-logo" alt="logo" />
+     <p>Page has been open for <code>{count}</code> seconds.</p>
      <a class="App-link" href="https://vuejs.org" target="_blank" rel="noopener noreferrer">
        Learn Vue
      </a>
    </header>
  </div>
Change some code on the page (like the “Learn Vue” button). You’ll see the timer does not reset.
What about other, non-Vue files like src/index.js? To re-render your Vue application when other files change, add this code snippet to the bottom:
// src/index.js

  export default app;

+ // Hot Module Replacement (HMR) - Remove this snippet to remove HMR.
+ // Learn more: https://www.snowpack.dev/concepts/hot-module-replacement
+ if (undefined /* [snowpack] import.meta.hot */ ) {
+   undefined /* [snowpack] import.meta.hot */ .accept();
+   undefined /* [snowpack] import.meta.hot */ .dispose(() => {
+     app.$destroy();
+   });
+ }
Going further
Great job! You’re now ready to build the Vue project of your dreams with Snowpack. Want to tweet your accomplishment to the world? Click the button below:
At this point you have the basics and have a great starter for any Vue project. The official Snowpack Vue example has a few other tools you might find useful:
- Prettier — a popular code formatter
- Tests — Snowpack supports any popular JavaScript testing framework
@snowpack/plugin-dotenv— Usedotenvin your Snowpack. This is useful for environment specific variables
If you have any questions, comments, or corrections, we’d love to hear from you in the Snowpack discussion forum or our Snowpack Discord community.